GSoC ’24: Adding functionalities to medical imaging visualizations
Hello Everyone! 👋
I am Divyansh, an undergraduate student from Guru Gobind Singh Indraprastha university, majoring in Artificial Intelligence and Machine Learning. Stumbling upon projects under the Juliahealth sub-ecosystem of medical imaging packages, the intricacies of imaging modalities and file formats, reflected in their relevant project counterparts, captured my interest. Working with standards such as NIfTI (Neuroimaging Informatics Technology Initiative) and DICOM (Digital Imaging and Communications in Medicine) with MedImages.jl, I became interested in the visualization routines of such imaging datasets and their integration within the segmentation pipelines for modern medical-imaging analysis.
In this post, I’d like to summarize what I did this summer and everything I learned along the way, contributing to MedEye3d.jl medical imaging visualizer under GSOC-2024!
If you want to learn more about me, you can connect with me on LinkedIn and follow me on GitHub
Background
What is MedEye3d.jl?
MedEye3D.jl is a package under the Julia language ecosystem designed to facilitate the visualization and annotation of medical images. Tailored specifically for medical applications, it offers a range of functionalities to enhance the interpretation and analysis of medical images. MedEye3D aims to provide an essential tool for 3D medical imaging workflow within Julia. The underlying combination of Rocket.jl and ModernGL.jl ensures the high-performance robust visualizations that the package has to offer.
MedEye3d.jl is open-source and comes with an intuitive user interface (To learn more about MedEye3d, you can read the paper introducing it here [1]).
What features does this project encompass?
This project covers implementation of several tasks that will enable the establishment of additional important functionalities within the MedEye3D package, facilitating enhancements within the visualization’s windowing for MRI and PET data, support for super voxels (sv), improved load times, high-level functionality implementation and robust viewing for multiple images.
Project Goals
The goals outlined by Dr. Jakub Mitura (my project mentor) and I, beginning of this summer were:
Migration of package reliance from Rocket.jl to base Julia channel and macros: The first decision that was made was to fix the issue of screen tearing and flicker, resulting from the Rocket.jl’s actor-subscription mechanism present at the core of MedEye3d.jl’s event-driven programming. Here, Julia’s threadsafe and asynchronous channels provided a way to introduce reactive programming and state management within MedEye3d without the tradeoffs resulting from external packages such as Rocket
Implementation of high level functions with simplified basic usage: Prior to this, MedEye3d involved initialization of data, texture specifications and text display for a final visualization. To reduce complexity, methods to abstract such chores were devised and implemented which resulted in the exposure of functions for loading images, accessing display data and modification of display data. This also encompassed the loading of images via MedImages.jl which required prior work for the integration of C++ ITK backend for image I/O.
Improved precompilation with decreased outputs to reduce start time
Automatic windowing for most common MRI and PET modalities: This task is a step in the direction of maintaining consistent visualizations across MRI and PET’s most common modalities, to mimic images similar to what is displayed within 3dSlicer for the same.
Adding support for multi-image viewing with crosshair marker for image registration
Adding support for the display of SuperVoxels sv with borders within the image slices to better understand anatomical regions within slices: Supervoxels, described either through indicator masks or meshes, encapsulate regions of interest with distinct image characteristics.
Additionally, we had a few stretch goals which are going to be a work in progress:
Visualization of structures by 3D rendering using OpenGL,
Support for MedVoxelHD visualization by voxel-based Hausdorff distance computation.
Support for OSX users
Tasks
1. Migration of package from Rocket to Julia’s Base.Channel
Initially, there was significant screen-tearing evident from the pixelated display of the rendered text and main image which, furthermore exhibited flickering upon scrolling through the slices in the relevant displayed image’s planar views i.e (Transversal, Coronal and Saggital). Troubleshooting along the way, we narrowed down the issue within the Rocket’s actor-subscription mechanism and decided to integrate Julia’s Base.Channel within MedEye3d.jl for handling the event and state management routine. Julia has asynchronous, threadsafe channels which facilitate in asynchronous programming with the help of a producer-consumer mechanism. An example usage of Base.Channel is as follows:
function consumer(channel::Base.Channel)
    while(true)
    channelData::String = take!(channel)
    println("Channel got " * channelData)
    end
end

newChannel = Base.Channel(100)

@async consumer(newChannel)
put!(newChannel, "apples")
Julia’s multiple dispatch made for the architectural setup of MedEye3d, facilitated fixing the issue of screen tearing. Below is how the on_next! function, invokes different reactive components based on the types of arguments it is dealing with.
Dump data in channel -> fetch data from the channel in an event loop -> invoke
on_next!(state, channelData)-> invoke relevant functionality based on the type of arguments passed

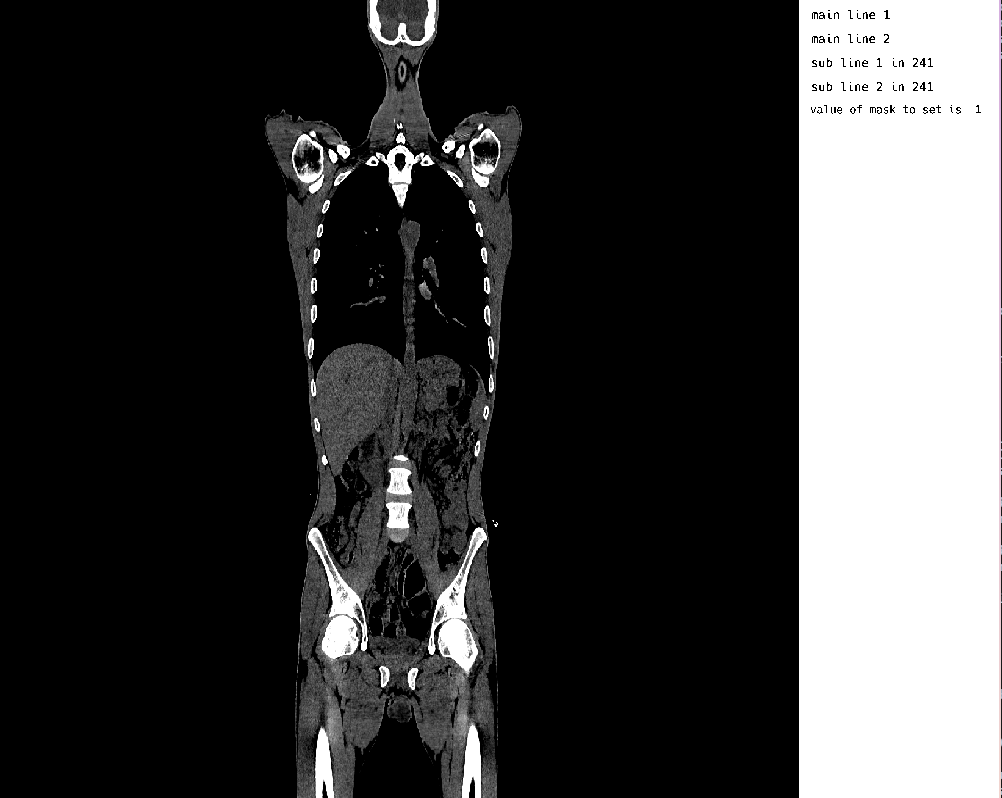
The end result was a visualizer with a seamless display of a CT image without any pixelating artifacts.
2. Implementation of high level functions with simplified basic usage
Implementing a bare-bones image visualization required a lot of function calls and definitions, in order to execute the following phases:
Rendering an image-plane with OpenGL
Loading data slices from the image
Creating texture specifications for modalities
Producing the final segmentation display
In order to simplify basic usage, high-level abstractions were put in place with the help of MedImages.jl (under ongoing development) library to load images in the form of MedImage objects to formulate a single display function for the user. Further simplifications were made to accommodate options for the user to manipulate the imaging data that is displayed currently in the visualizer i.e retrieval of voxel arrays and their modification. Taking this in mind, the following relevant functions were exposed:
Putting all of the above functions to use together, we can launch the visualizer, retrieve the displayed voxel data and modify it to our liking. A sample script to achieve the former, is highlighted below:
using MedEye3d
ctNiftiImage = "/home/hurtbadly/Downloads/ct_soft_study.nii.gz"
medEyeStruct = MedEye3d.SegmentationDisplay.displayImage(ctNiftiImage)
displayData = MedEye3d.DisplayDataManag.getDisplayedData(medEyeStruct, [Int32(1), Int32(2)]) #passing the active texture number

# We need to check if the return type of the displayData is a single Array{Float32,3} or a vector{Array{Float32,3}}
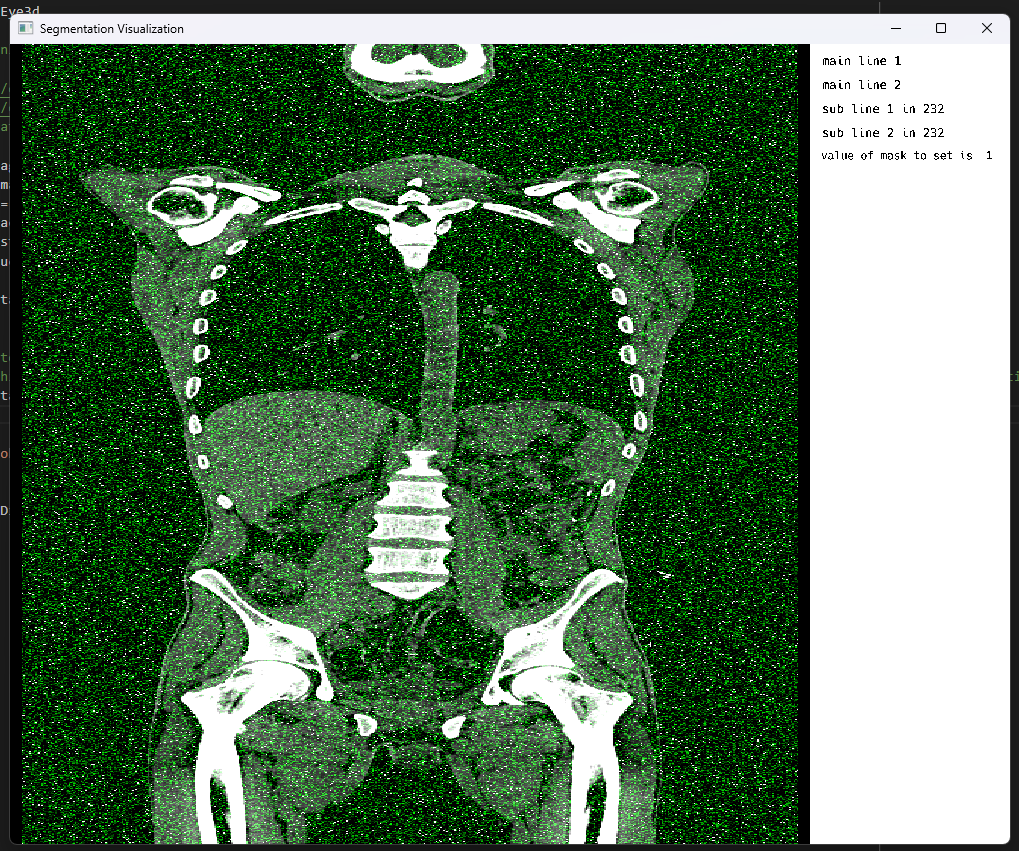
# Now in this case we are setting Gaussian noise over the manualModif Texture voxel layer, and the manualModif texture defaults to 2 for active number

displayData[2][:, :, :] = randn(Float32, size(displayData[2]))
MedEye3d.DisplayDataManag.setDisplayedData(medEyeStruct, displayData)
The result of this Gaussian noise within the annotation layer, made for an outcome like the following:
3. Improved precompilation with decreased outputs to reduce start time
Previously, the package’s precompilation was failing in Julia v1.9 and v1.10 due to pattern matching errors arising after the usage of match macros from the Match.jl pkg in MedEye3d’s keymapping workflow between GLFW callbacks from mouse and keyboard. The relevant equivalent native conditional (if-else) statements, resolved the issue and facilitated in successful precompilation of the package. Further, only following minimal outputs were produced during precompilation:

Changes highlighted within the following pull-request:
4. Automatic windowing for most common MRI and PET modalities
Windowing is a crucial aspect of medical imaging, particularly in MRI (Magnetic Resonance Imaging) and PET (Positron Emission Tomography) modalities. It enables radiologists to enhance the contrast of images, highlighting specific features and improving the overall diagnostic accuracy. Windowing involves controlling the display range of pixel values to optimize the contrast between different tissues or structures. The display range is defined by two values: the minimum (min) and maximum (max) values that contribute to the final range of pixels that are displayed. By adjusting these values, radiologists can enhance or suppress specific features in the image, facilitating a more accurate diagnosis.
The setTextureWindow function utilizes a set of predefined keymap controls to simplify the windowing process. The F1-F7 keys are designated for controlling windowing in MRI and PET modalities. The keymap controls are as follows:
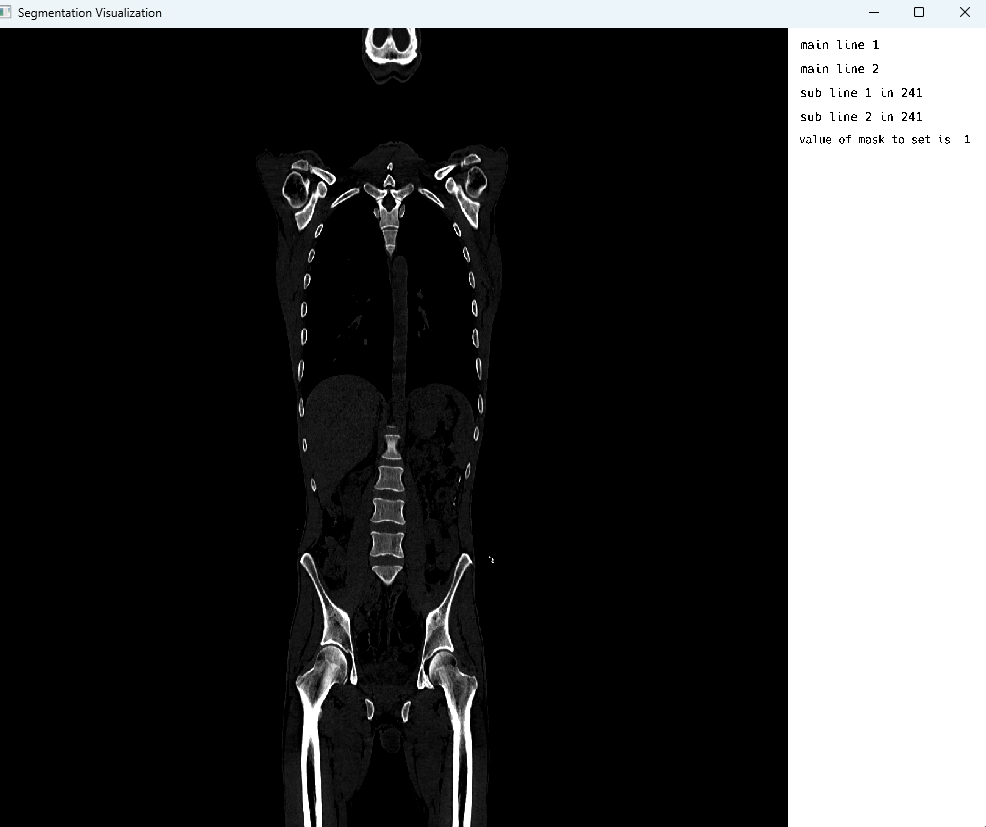
F1: Display wide window for bone (CT) or increase minimum value for PET
F2: Display window for soft tissues (CT) or increase minimum value for PET
F3: Display wide window for lung viewing (CT) or increase minimum value for PET
F4: Decrease minimum value for display
F5: Increase minimum value for display
F6: Decrease maximum value for display
F7: Increase maximum value for display
Implementation of setTextureWindow Function
The setTextureWindow function is designed to update the texture window settings based on the input keymap control. The function takes three arguments:
activeTextur: The current texture specificationstateObject: The state data fieldswindowControlStruct: The window control structure containing the letter code for the keymap control
The function performs the following steps:
- Checks the letter code of the keymap control and updates the minimum and maximum values of the texture specification accordingly.
- Updates the uniforms for the texture specification using the
controlMinMaxUniformValsfunction.
function setTextureWindow(activeTextur::TextureSpec, stateObject::StateDataFields, windowControlStruct::WindowControlStruct)
    activeTexturName = activeTextur.name
    displayRange = activeTextur.minAndMaxValue[2] - activeTextur.minAndMaxValue[1]
    activeTexturStudyType = activeTextur.studyType
    if windowControlStruct.letterCode == "F1"
        if activeTexturStudyType == "CT"
            #Bone windowing in CT
            activeTextur.minAndMaxValue = Float32.([400, 1000])
        elseif activeTexturStudyType == "PET"
            activeTextur.minAndMaxValue[1] += 0.10 * displayRange #windowing for pet, in the case of PET simply increase the minimum by 20% , doing the same in f1,f2 and f3
        end
    elseif windowControlStruct.letterCode == "F2"
        if activeTexturStudyType == "CT"
            activeTextur.minAndMaxValue = Float32.([-40, 350])
        elseif activeTexturStudyType == "PET"
            activeTextur.minAndMaxValue[1] += 0.10 * displayRange
        end
    elseif windowControlStruct.letterCode == "F3"
        if activeTexturStudyType == "CT"
            activeTextur.minAndMaxValue = Float32.([-426, 1000])
        elseif activeTexturStudyType == "PET"
            activeTextur.minAndMaxValue[1] += 0.10 * displayRange
        end
    elseif windowControlStruct.letterCode == "F4"
        activeTextur.minAndMaxValue[1] -= 0.20 * displayRange
    elseif windowControlStruct.letterCode == "F5"
        activeTextur.minAndMaxValue[1] += 0.20 * displayRange
    elseif windowControlStruct.letterCode == "F6"
        activeTextur.minAndMaxValue[2] -= 0.20 * displayRange
    elseif windowControlStruct.letterCode == "F7"
        activeTextur.minAndMaxValue[2] += 0.20 * displayRange
    elseif windowControlStruct.letterCode == "F8"
        activeTextur.uniforms.maskContribution -= 0.10
    elseif windowControlStruct.letterCode == "F9"
        activeTextur.uniforms.maskContribution += 0.10
    end

    stateObject.mainForDisplayObjects.listOfTextSpecifications = map(texture -> texture.name == activeTexturName ? activeTextur : texture, stateObject.mainForDisplayObjects.listOfTextSpecifications)
    coontrolMinMaxUniformVals(activeTextur)
end
Bone windowing in CT
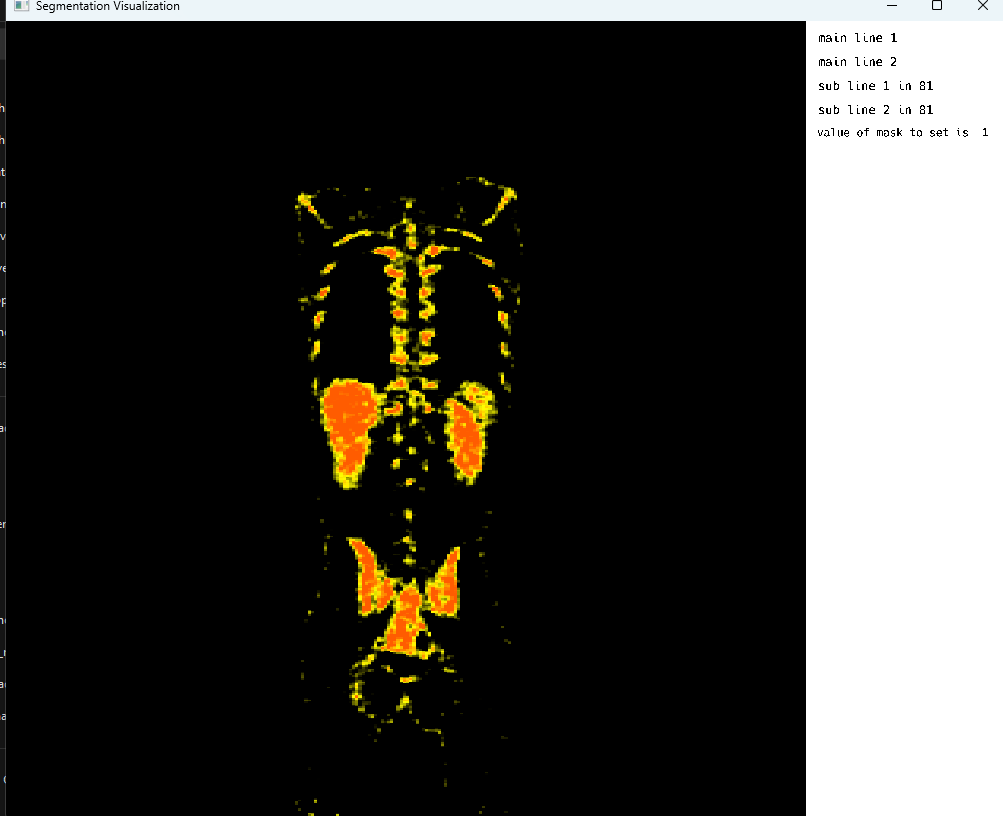
Bone windowing in PET
5. Adding support for multi-image viewing with crosshair marker for image registration
Following the mid-term evaluation, MedEye3d.jl underwent a significant enhancement, whereby a multi-image display capability was implemented through a series of refinements. Specifically, a novel approach was adopted, whereby separate OpenGL fragment shaders were introduced to concurrently render images on either side of the visualizer, namely the left and right views. Prior to integrating voxel data into the fragment shaders, an initial series of tests involved evaluating individual colors to validate the integrity of the double image display. A screenshot from one of these critical testing phases is presented below: 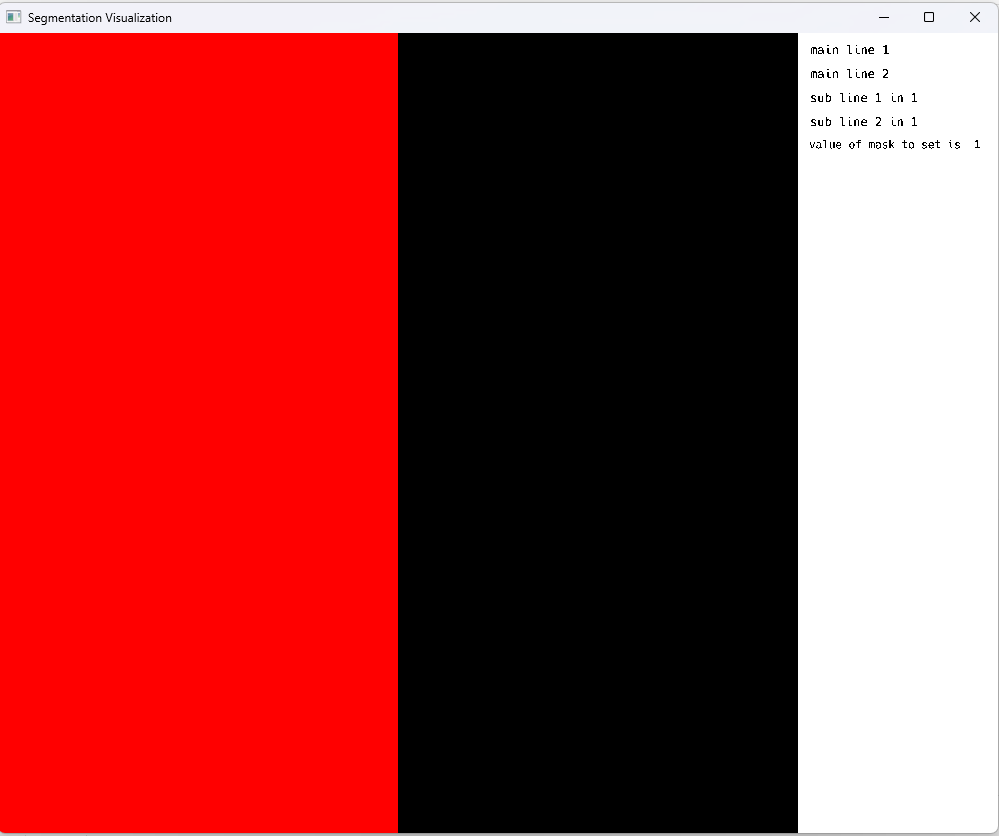
The shaders were further manipulated to automatically initialize for each of the images separately. Further, the reactive aspect of the visualizer in multi-image display mode was iterated upon and now, instead of a single state management struct, a vector of states was being passed around, facilitating the user to scroll each of the images separately just by simply hovering their mouse over either of the image, activating its relevant associated state struct.
Down below, is the struct for state that handles all of the things currently related with an image:
@with_kw mutable struct StateDataFields
  currentDisplayedSlice::Int = 1 # stores information what slice number we are currently displaying
  mainForDisplayObjects::forDisplayObjects = forDisplayObjects() # stores objects needed to  display using OpenGL and GLFW
  onScrollData::FullScrollableDat = FullScrollableDat()
  textureToModifyVec::Vector{TextureSpec} = [] # texture that we want currently to modify - if list is empty it means that we do not intend to modify any texture
  isSliceChanged::Bool = false # set to true when slice is changed set to false when we start interacting with this slice - thanks to this we know that when we start drawing on one slice and change the slice the line would star a new on new slice
  textDispObj::ForWordsDispStruct = ForWordsDispStruct()# set of objects and constants needed for text diplay
  currentlyDispDat::SingleSliceDat = SingleSliceDat() # holds the data displayed or in case of scrollable data view for accessing it
  calcDimsStruct::CalcDimsStruct = CalcDimsStruct()   #data for calculations of necessary constants needed to calculate window size , mouse position ...
  valueForMasToSet::valueForMasToSetStruct = valueForMasToSetStruct() # value that will be used to set  pixels where we would interact with mouse
  lastRecordedMousePosition::CartesianIndex{3} = CartesianIndex(1, 1, 1) # last position of the mouse  related to right click - usefull to know onto which slice to change when dimensions of scroll change
  forUndoVector::AbstractArray = [] # holds lambda functions that when invoked will  undo last operations
  maxLengthOfForUndoVector::Int64 = 15 # number controls how many step at maximum we can get back
  fieldKeyboardStruct::KeyboardStruct = KeyboardStruct()
  displayMode::DisplayMode = SingleImage
  imagePosition::Int64 = 1
  switchIndex::Int = 1
  mainRectFields::GlShaderAndBufferFields = GlShaderAndBufferFields()
  crosshairFields::GlShaderAndBufferFields = GlShaderAndBufferFields()
  textFields::GlShaderAndBufferFields = GlShaderAndBufferFields()
  spacingsValue::Union{Vector{Tuple{Float64,Float64,Float64}},Tuple{Float64,Float64,Float64}} = [(1.0, 1.0, 1.0)]
  originValue::Union{Vector{Tuple{Float64,Float64,Float64}},Tuple{Float64,Float64,Float64}} = [(1.0, 1.0, 1.0)]
  supervoxelFields::GlShaderAndBufferFields = GlShaderAndBufferFields()
end
After the integrity of the fragment shaders was verified in multi-image, voxel data for the images was integrated and further modifications to the high-level functions were made and eventually the following script produced a rather appealing result.
Script for loading the same NIFTI image twice in the visualizer for side-by-side display:
using MedEye3d
ctNiftiImage = "/home/hurtbadly/Downloads/ct_soft_study.nii.gz"
MedEye3d.SegmentationDisplay.displayImage([[ctNiftiImage],[ctNifitImage]])
Results in :
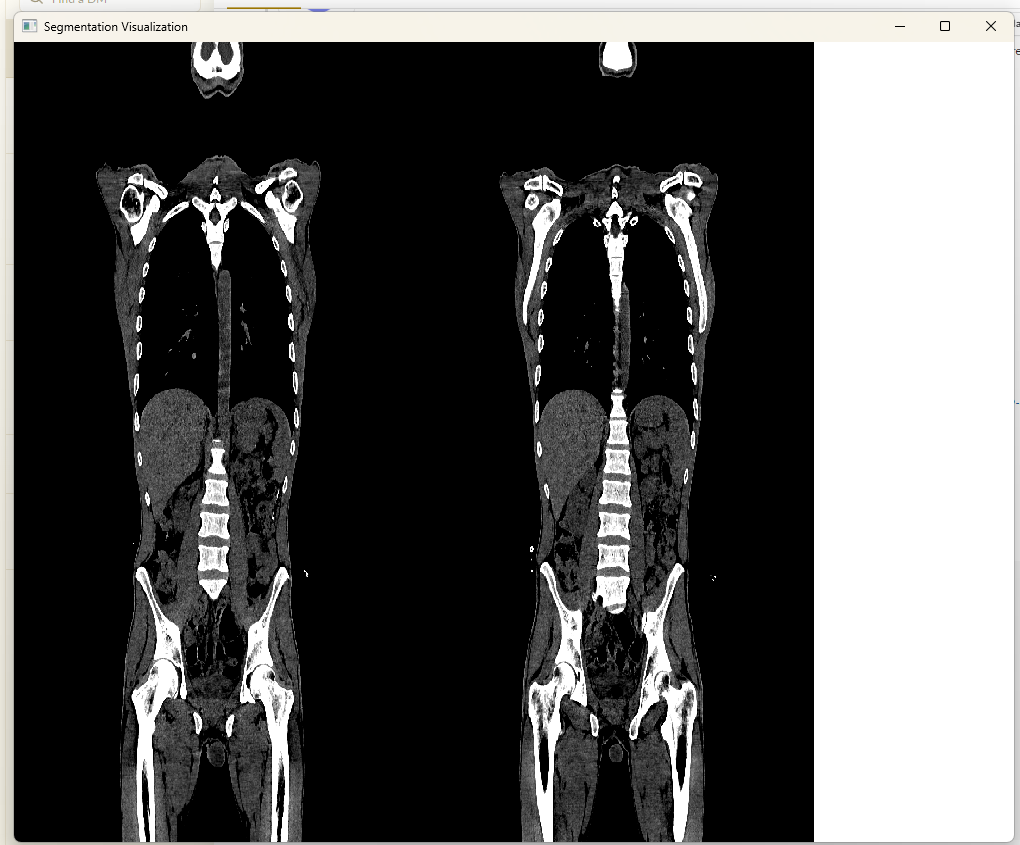
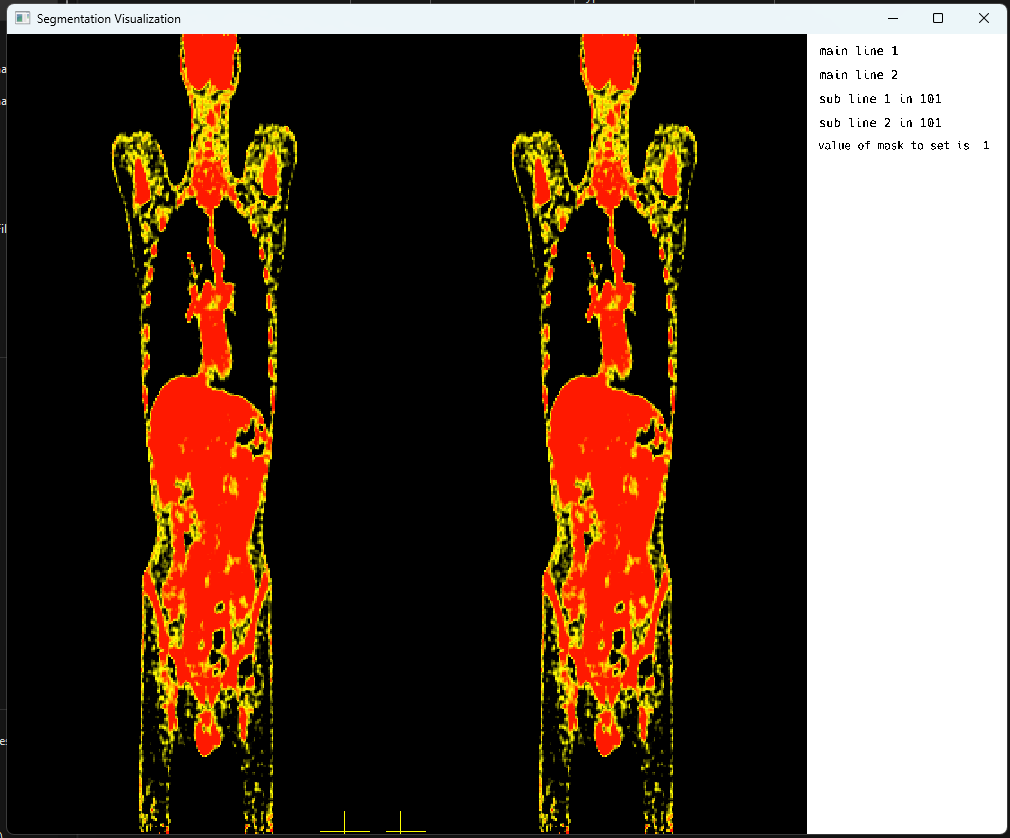
Crosshair marker for image registration are displayed in the relevant passive image to hightlight the same anatomical regions based on the spatial meta-data of the images i.e spacing, origin and direction. In order to achive the crosshair rendering in the passive image, the following action items were devised:
Retrieval of GLFW Mouse Callbacks for x and y position of the cursor in window coordinates (0 to window-width) from the active image
Conversion of these x and y window coordinates into their relevant active image x and y texture coordinates
Conversion of these texture coordinates into real space point with the help of spatial metadata
Conversion of the real space point into the texture coordinates of the passive image
Conversion of the passive image texture coordinates into their relevant OpenGL coordinate system values (-1 to 1)
Rendering of crosshair on OpenGL coordinate in passive image
Conversion between different coordinate systems and accounting for the image’s spatial metadata during calculating proved to be challenging at first, but with multiple revisions, a final solution was achieved with seemingly no noticeable amount of lag or delay. One such frame of [CT] images with crosshair display in multi-image is depicted below:
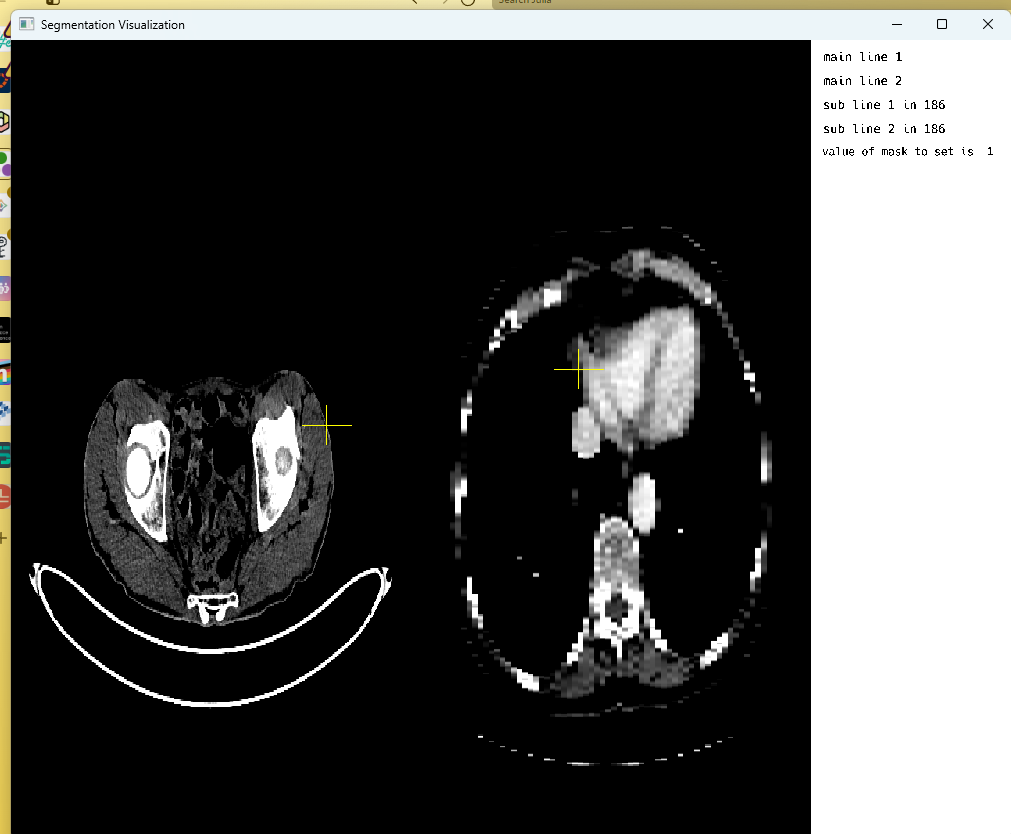
Another frame from the openGL rendering cycle, highlighting PET images with crosshair display in multi-image mode:
6. Adding support for the display of SuperVoxels sv with borders within the image slices to better understand anatomical regions within slices
In enhancing MedEye3d’s functionality, supporting super voxels (sv) with boundaries becomes paramount. The sv rendering, effectively capturing gradients, serves as the cornerstone for detecting these boundaries within both MRI and PET volumes. Supervoxels, described either through indicator masks or meshes, encapsulate regions of interest with distinct image characteristics. By integrating boundary detection for super-voxels, MedEye3d can offer enhanced segmentation capabilities, enabling more precise delineation and analysis of anatomical structures and pathological regions within medical imaging data.
Supervoxels are basically a collection of voxels that share similar image properties. For example: in MRI scans of the brain cortex, super voxels could represent clusters of voxels corresponding to specific anatomical regions or functional areas. The main objective of this task was to add support for the display of super voxel-based segmentation of images, followed by some janitorial tasks:
Display of the borders of super-voxels (sv), extracted using the machine learning algorithms.
Checking image gradient agreement with super-voxel borders.
This initial workflow involved, the initialization of relevant buffers in OpenGL for dynamic rendering of lines over the image display, namely vertex array buffers (vao), vertex buffers (vbo) and edge buffers (ebo). Further, these buffers are updated on a scroll event, where the information from the currently displayed slice is passed to the event handler, which invokes a function that updates the vertex buffer (vbo) with new vertices pertaining to the relevant slice number and planar view, precalculated from an HDF5 file during initialization of the visualizer. For instance, if the user is scrolling in the 3rd axis (transversal plane) and is currently on slice 40, the supervoxel display will pertain to edges specifically calculated for that specific slice in that plane.
Eventually, with ever so increasing number of attempts and a few hurdles along the way, one of which particularly stood out since it marked our first step towards a good direction:
Challenges in rendering
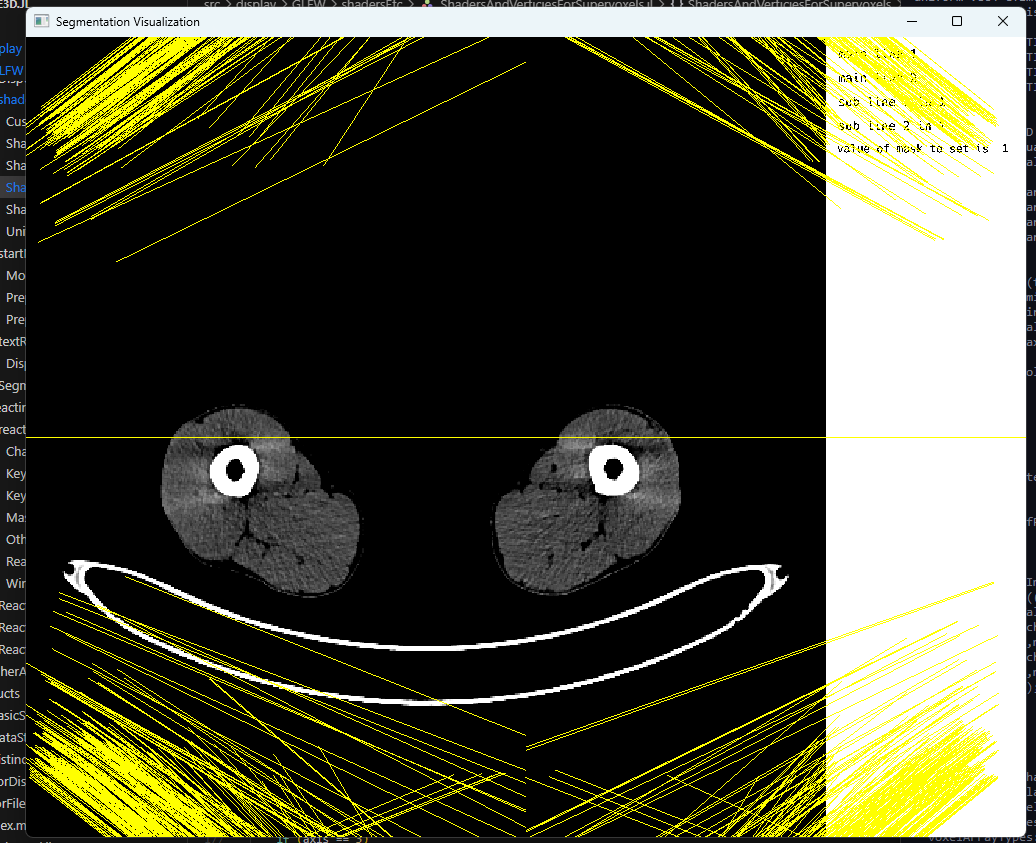
At last, an appealing result hit our sight.
Final result
Note: The image borders are intentional to emphasize the size of the visualizer which is currently defaulted to a certain width and height.
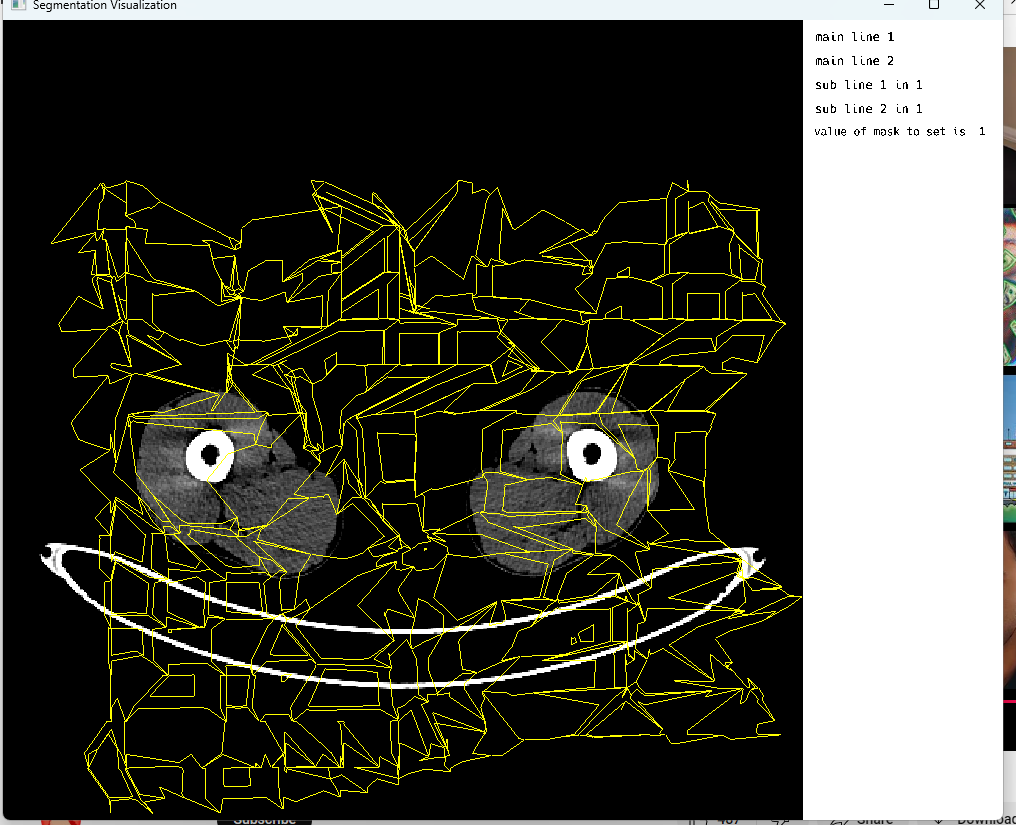
Note: However, There are a few things left to cover here, most of which revolve around MedImages.jl and documentation for the same. List of PRs that facilitated the completion of the tasks highlighted above:
Contributions Beyond Coding
1. Mentoring and Guidance
I regularly organized meetings with my mentor to seek guidance on project direction and troubleshooting issues in the visualizer. This ensured that I stayed on track, received timely feedback, and addressed any challenges that arose.
2. Package Documentation and Community Contribution
I contributed to other medical imaging sub-ecosystem packages in JuliaHealth, including MedImages.jl and MedEval3D.jl. Specifically, I set up documentation for these packages using DocuementerVitepress.jl. This not only enhanced the functionality of these packages but also helped maintain a coherent and organized package ecosystem.
3. Multirepo Management and Collaboration
In addition to my work on the MedEye3d visualizer, I made significant contributions to other JuliaHealth repositories, including MedImages.jl and worked over an Insight Toolkit wrapper library ITKIOWrapper.jl for support in image I/O down the road in MedImages.jl. I also maintained relevant documentation and ensured continuous collaboration and synchronization across these packages.
Conclusions and Future Development
Within the scope of this 350-hour project, a comprehensive range of objectives were successfully addressed. Noteworthy achievements include:
Fixed screen tear and flicker within the visualizer. Integration of threadsafe Julia channels.
Achieved multi-image display over CT and PET modalities with crosshair rendering (Although, only one modality can be visualize at a time, i.e either CT | CT or PET | PET).
Achieved supervoxel display in single image display mode.
Achieved automatic windowing of MRI and PET most common modalities.
Future work would include:
Support for the users on Darwin (Apple-based platforms).
Apart from that, we would need to add a function that dynamically allocates the texture number to the manual modification mask, regardless of the number of images passed for display, which is currently defaulted to 2.
Also, in the future, we would explore the stretch goals a bit more rigorously, particularly the implementation of MedVoxelHD within MedEye3d.
Acknowledgements 🙇♂️
Jakub Mitura: aka, Dr. Jakub Mitura
I would like to thank my mentor Dr. Jakub Mitura, for his help through out every phase of this project. The troubleshooting routines around problems would have rendered the project unsuccessful, if not for the support and guidance of my mentor throughout each part of this project. I would also like to thank Jacob Zelko, for leading the Juliahealth community with such vast expertise and leading efforts for engagement amongst the members through monthly meetings. My sincere gratitude towards your support, help and guidance through out the fellowship.
References
Citation
@online{goyal2024,
  author = {Goyal, Divyansh},
  title = {GSoC ’24: {Adding} Functionalities to Medical Imaging
    Visualizations},
  date = {2024-11-01},
  url = {https://juliahealth.org/JuliaHealthBlog/posts/divyansh-gsoc/gsoc-2024-fellows.html},
  langid = {en}
}